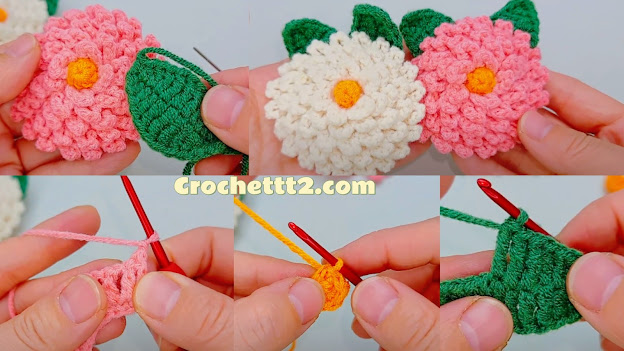
How to crochet a flat dahlia flower for beginners – easy and beautiful DIY tutorial!
🧶 Materials Required
-
Worsted- or DK-weight yarn in one or two colors.
-
Crochet hook (suggested size: 4 mm / G-6).
-
Scissors and tapestry needle.
-
(Optional) Stitch marker to mark round starts.
Step 1: Create the Center Ring
-
Start with a magic ring: Form a loop with the yarn tail crossing underneath the working yarn.
-
Chain 1 to secure.
-
Work 6 single crochets (sc) into the ring.
-
Pull the tail to tighten and close the center hole.
-
Slip stitch (sl st) into the first sc to join the round.
Step 2: Build the Dahlia Center
-
Round 2: Chain 1, then 2 sc in each stitch all the way around (total 12). Join with sl st.
-
Round 3: Chain 1, 1 sc in next stitch, 2 sc in following stitch; repeat around (total 18). Join.
-
Round 4: Chain 1, sc in next 2 stitches, 2 sc in the next one; repeat around (total 24). Join.
-
Continue increasing this spiral pattern until your circle measures about 4 cm across (usually 4–5 rounds).
Step 3: Begin Petal Formation
-
Switch to pattern for petals:
-
Chain 3, skip one stitch, sl st into next stitch to create first loop.
-
Repeat chain 3, skip one, sl st around to form evenly spaced loops.
-
Adjust chain length if petals need to be longer or shorter.
-
Step 4: Crochet the Petals
-
Working inside each ch‑3 loop:
-
Chain 1 to start.
-
Work 5 double crochets (dc) into the loop (or desired number for fullness).
-
Chain 1, then sl st back into the base.
-
-
Repeat this for each loop around to form petals.
Step 5: Add More Petal Layers (Optional)
-
For a fuller flower, create a second layer:
-
Insert hook behind the base of each existing petal.
-
Chain 3 and repeat the petal stitch sequence for a layered effect.
-
This builds a 3D look with overlapping petals.
-
Step 6: Finalize and Fasten Off
-
After completing the last petal layer, slip stitch to secure.
-
Cut yarn and pull the tail through the final loop.
-
Use a tapestry needle to weave in and hide all yarn ends neatly on the underside of the flower.
Step 7: Optionally Add Leaves
-
With green yarn (or color of choice), attach at a petal base or side:
-
Chain 4 (or desired leaf length).
-
Work single, half-double, double, half-double, and single crochet in successive chains to form a pointed leaf shape.
-
Slip stitch back to base, cut yarn, and weave in ends.
-
Step 8: Block and Shape Your Flower
-
Gently flatten and pin the petals into place.
-
Lightly steam or spray with fabric stiffener, then let dry so the petals hold their form.
📝 Summary Table
| Stage | Stitches & Technique |
|---|---|
| Center | Magic ring → 6 sc; increase rounds until ~4 cm |
| Petal loops | ch-3 loops around base |
| Petals | 5 dc inside loops, anchored with ch-1 sl st |
| Optional layers | Build petals in the back to add depth |
| Leaves (optional) | ch-4 + sc/hdc/dc/hdc/sc shell structure |
| Finish | Secure, weave ends, block for shape retention |
Tips From the Video
-
Use a stitch marker to track the start of each round for consistent spacing.
-
Tight chain loops keep petals perky and defined.
-
Work petals back-to-back for a raised, flower-like appearance.
-
Be sure to block for neat, flat presentation—especially if using in appliqués or brooches.

.jpeg)
.jpeg)
.jpeg)
.jpeg)
.jpeg)
Comments
Post a Comment